Thursday, 13 September 2012

Breadsticks

Here's something for a fun snack - maybe even get the kids to do them.  Great for a party as well I should imagine

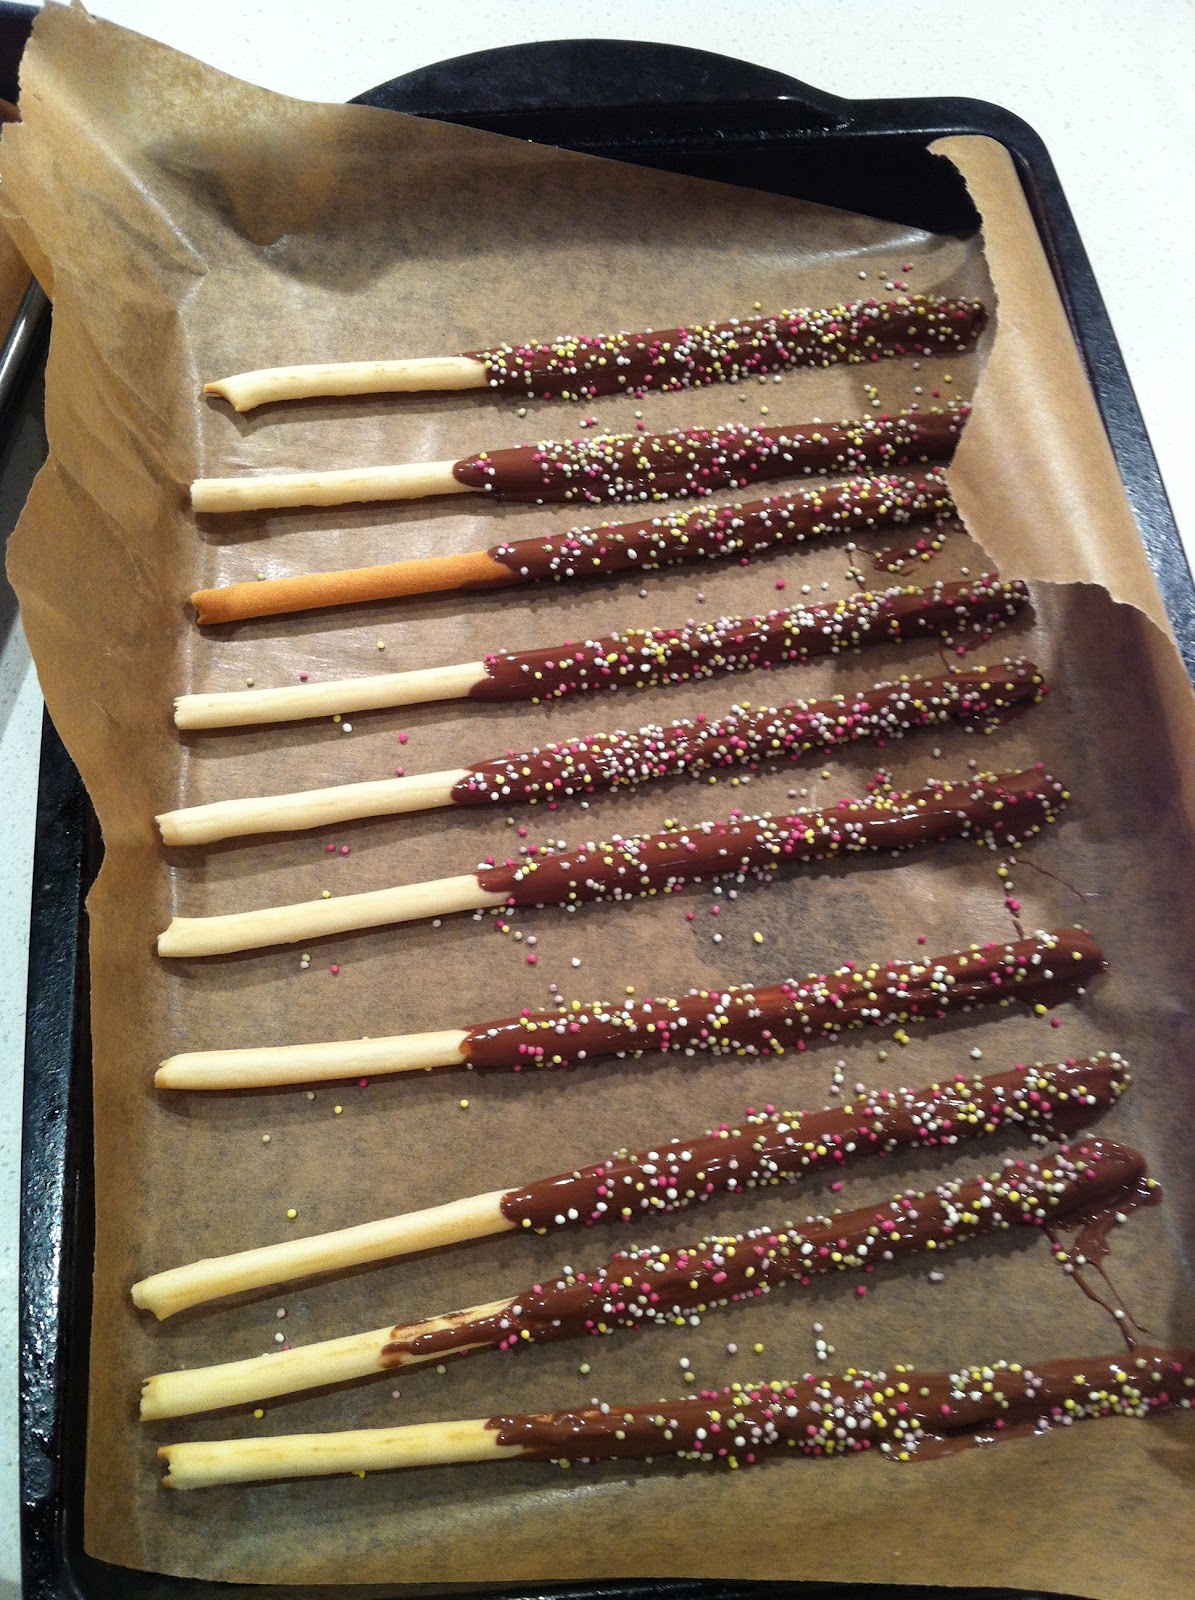
Take a packet of breadsticks (the thinner ones work best), melt some chocolate in a bowl, cover about three-quarters of the breadsticks in the melted chocolate and then lay them down on a baking tray covered with baking paper, sprinkle with hundreds and thousands, allow to cool and then allow hoards of children to decimate them in the manner of a swarm of locusts.

Here's a pic


And whilst I would like to claim credit for this idea, it must go to my sis-in-law H who had purchased one single breadstick prepared in this style for 50p from a soft play centre!  By my reckoning if you prepare them yourself you'll save a packet :)

Wednesday, 22 August 2012

Clothing rescue

I have this nice top


That I managed to put a hole in - oops!


Thankfully the hole wasn't in too awkward a place so I decided that I could probably patch it.  I remembered that Jo had posted about embellishing her cardi here.  I mentioned this to her over tea (at playgroup naturally) and she offered the use of her Cath Kidston "Make" book - note to self: must now return book.

Having had a browse through I decided that one patch might look a bit odd but there was a t-shirt in the book embellished with stars.  So I purchased these items


Some white felt, fusible web and some grey embroidery thread.

I then traced some of the stars onto the fusible web


And then cut them out, pinned them to the felt and cut the felt stars out


I cut out one large star (to cover the hole), two medium stars and four small stars - I do like things to be even, random is definitely not my forte!  I then pinned them onto my top to make sure I got the layout right


Ironed them in place (about 10 seconds with a steam iron), having placed a tea towel on the top of the stars to make sure the felt didn't distort with the heat.  To make sure they stayed in place (although the fusible web did a great job) I then blanket stitched round each star


If you're not sure how to do a blanket stitch then it's worth searching Youtube, as there's bound to be a video showing you how to do it - I learnt how to ladder stitch the same way.

So here's the finished article


One top rescued from the rubbish bin :)

Fruit Kebabs

I am always trying to get Max to eat more fruit and veg, Penelope on the other hand can't get enough of the stuff - to the extent that she will happily eat the peel along with the orange....

It isn't an easy task persuading Max that fruit is nice so when Penelope made some fruit kebabs at nursery I decided to try it at home.  I assembled these ingredients


You can use any fruit you like, but obviously fruits like banana and apple will need eating quickly before they go brown. I also used some mini marshmallows as an added enticement for Max.

Melt the chocolate in the microwave - do it in small short bursts and stir in between otherwise you risk burning the chocolate and making it unusable. Then put the fruit etc on the wooden sticks


Then drizzle with the melted chocolate.  Children will need to be supervised as the chocolate and bowl will be hot.


Put in the fridge to set the chocolate and you're all done.

You will note that Max doesn't appear in these photos as he wasn't feeling well when we did this but he did at least eat the results - that's a success in my book!!

Try it - it's fun and healthy- if you ignore the chocolate part :)

Tuesday, 14 August 2012

Olympic/Lego Fever

I don't know about you but the Olympics have been a fixture in our lives for the last two weeks.  Even if we've not been watching it, it's been on in the background.  Max has witnessed me shouting at the rowers, swimmers, cyclists and athletes.  He was very disappointed when we only won silver in one of the rowing events and I had to spend some time telling him about "taking part" and "trying your best" and the fact that silver meant you were the second best in the whole world!!  Somehow though I don't think he was quite convinced.

Of course for Max no event would be complete without some Lego and we have been collecting the Team GB Lego minifigures.  After some loitering in two well known supermarkets feeling all the packets for giveaway parts ("Ooo Max that's a tennis racket, we need the tennis player"), we completed the set.  To be honest I think I was more excited about completing the set than Max was....

Here are the little fellas (and the girls) in all their glory


I'm hoping that in 20 years time a full set will be worth something (!) and this got me to thinking about how we could keep them safe from the children display them and I remembered this from Pinterest so I got to work and got this frame from Ikea


And assembled these items and some superglue


As I didn't actually read the blog post before commencing on my project (as opposed to now when I am writing this post - oops!), I opted to take the glass out (although this is possibly a safer option for the kids) and painted the backing board white, although you could paint it whatever colour you wanted to fit in with your theme.


I then reassembled the frame (minus the glass) and then glued 9 pieces of 2x2 Lego blocks to the backing board.  Obviously the Lego bricks had to be red, white and blue to keep in with the Team GB theme.


The minifigures were then placed on each of the bricks and look like this


The obvious advantage is that the minifigures can still be taken off the bricks and still played with, although if Max loses any bits there will be trouble!!

Having reviewed several posts I am wondering whether this blog should be more aptly entitled "Musings from a Lego Mum"......
Friday, 10 August 2012

I DON'T believe it

How, just HOW, is it possible that my boy has already done a whole year at school??? AND that we're already three weeks into the summer holidays???

Here he is on the last day of reception


Although the tie was his own addition....

Of course the end of his first school year meant the pressure of getting some presents for his teachers.  Thankfully the mum of one his friends, L, suggested that we all chip into a big present.  So we duly chipped in but I also wanted to give his teachers something a bit more personal from Max.  Inspired by this post from my friend's blog, we made some noteblocks


As there are two reception classes and the teachers work across the two classes, I wanted to do something not just for Max's teacher and teaching assistant but also the teachers and teaching assistants in the other class.  So inspired by something I saw somewhere on Pinterest, I made some cookies using this recipe and then put them in bags with a tag


Well done Max for such a great first year - we're so proud of you!

Monday, 30 July 2012

And lo yet more Lego appeared...

I mentioned in my last post that it was Max's birthday recently and inevitably that meant an influx of new Lego (can anyone say "spoilt child"??!!), including (but not limited to) a police station, truck, helicopter and several pieces from the new Dino range.

Now there's nothing I like more than a bit of good organising and all this Lego left me thinking how on earth we were going to store the damn stuff.  Short of using all the Lego (and trust me there's enough) to construct a shed for it in the back garden, some consideration needed to be given to the layout of Max's bedroom and the storage options available.  Max has two Ikea units in his bedroom, one being used for all his books and some random toys/dressing up stuff and the other for Lego.  The Lego unit left a lot be desired as all the Lego was housed so most of it couldn't be seen.  I had previously googled "Lego" for an image, when I was looking for inspiration for Max's birthday cake, and I came across a blog post which of course I can no longer find but this one is similar.  As one of the storage units in Max's bedroom is the Trofast one (the one with the books/random toys on) it seemed sensible to have a shift about.

So the art easel (which Max no longer uses but Penelope is obsessed with) was moved into Penelope's room.  Then the books all moved across to the other storage unit, after the younger books were weeded out and moved onto Penelope's bookcase.  Penelope got as much out of this as Max did.

At this point a trip to Ikea was required to acquire some storage bags and some more of the drawers that fit in the Trofast system.  And, as is inevitable with a trip to Ikea, several other non-essential items also acquired - seriously how do they do it??

After bringing home all the essential and non-essential (but seemed it at the time) items, I moved all his dressing up stuff into a storage bag under his bed and redistributed the random toys to other storage units about the house, the loft and some charity bags.

At this point I needed to name the drawers so after using a bit of WordArt on the computer, and shading the WordArt the appropriate colour some drawer names were created and then laminated using my bargain laminator from Tesco.  How can they sell a laminator for only £12??  After a bit lot of sorting out individual Lego bricks Max's Trofast system now looks like this


The larger bottom drawers have a colour theme whereas the two smaller top drawers contain mini-figures and also the tinier more technical bits which would never be found again if they went in the colour coded drawers.

I have even arranged all the instruction booklets in some lever arch files (top left of the photo above) but do confess to having got slightly carried away by laminating an index of the booklets and putting it on the front of the files.....

Max was very pleased with this turn of events


The brilliant thing about this is that it has made the Lego much more accessible to Max and he has already built lots more things just because he can see all the bits.  I had suggested to him that we could break up all the built pieces but that was a step too far for a five year old.  Instead he has satisfied himself with taking apart a piece at a time and then immediately rebuilding it.  Lego - the toy that keeps on giving!!

And, having posted a photo of my efforts on Facebook, a certain person at Two Owls Design also arranged some Lego in a similar fashion, albeit without the lamination - although I have offered my services.

Now if I could just work out where to put all the Lego that is currently residing on our dining table I could call all this organisation a success.....

Thursday, 19 July 2012

Birthday Cakes Again

Max turned 5 at the beginning of July and yet again I needed to make birthday cakes.  And this time I had to make three - eek!  Max and his friend P were having a joint birthday party - well they are in the same class and their birthdays are only a fortnight apart so it saved me and V half the cost!!  I made the mistake of letting Max and P look through a birthday cake book that my friend J had lent me.  It was inevitable that, as they had decided on a knight and princess party (well they are 5) that they would both choose different castle cakes.....

So here's P's cake - this one was actually fairly easy to make as it was constructed entirely of swiss roll. I adapted the decoration to make turrets etc with ice cream cones.


And here is Max's


This one wasn't very complicated but it took ages.  It was quite fiddly putting on the individual bits of icing to get the stone effect.  I think it probably took about 4-5 hours to decorate.  My best friend whilst making this cake was edible glue!  It is amazing and very useful for things like this.

Now as we had Max's birthday party almost two weeks before his birthday, Max had a friend come for tea on his birthday and of course that meant another cake.  Now as you may recall Max is more than a little obsessed with Lego so, to make life a little bit easier for me, I decided to make a Lego brick.


One rectangular cake was made and then I cut some circles out from the excess using a cookie cutter.  Funnily enough my friend Jo had the same idea for Aidan's birthday cake - great minds think alike and all that.